Monday, February 27, 2012

Scrabble pillows

Scrabble pillows are everywhere these days!  I discovered them on etsy awhile ago and thought they were really clever.  The problem is once you spell out a word, you're dropping serious money!  I figured they would be pretty easy to DIY.  I enlarged and printed out the first name initials for my husband and I using Arial font.  I thought a natural dyed fabric would look the most like the wood tiles, so I went looking for burlap.  It was way too rough, so I switched to more of a linen fiber fabric.  I bought a sheet of black felt and a tube of black puffy paint (remember that stuff?) If you are a child of the 80s, like me, then you are familiar!
I used the cut-out letters as templates to cut out the black felt.  I used actual scrabble tiles as a reference and then carefully drew on the point values with puffy paint.  I love that the numbers by both of our initials are equal...because marriage should be equal ;)
homemade sew scrabble pillows DIY Just Peachy, Darling
After the paint was completely dry,  I sewed and stuffed the pillows.  I didn't want the letters to get distorted so I was careful not to over stuff the pillows.  My finished pillows are about 12x12.

Those sweet cane back chairs belonged to my late grandparents, but the orange crushed velvet (while pristine) just isn't doing it for me anymore.  They are my next project...


Sunday, February 26, 2012

Vintage silhouettes

  On Friday, I finished the gallery wall in the boys' shared bedroom.  I made silhouette art using sheets of black vinyl adhesive, intended for wall decals.  There is a lot of software on the market for doing this, but I don't own a cricut, so I did mine the low-tech way.  I took digital side profile pics, printed them out, carefully cut them out and then used them as templates to trace onto the backside of the vinyl ahesive sheet.  I adhered mine to plain white cardstock, but these would look adorable on scrapbooking paper too.  Taking the photos was by far the hardest part of the project.  Having my five and three year old stand still was hard enough, but getting them to "look natural" was next to impossible.  When they weren't looking the wrong way, they were sucking in their lips, giggling, and making kissy faces.   Ohlin, especially, could not keep it together.
Oh well, I was just impressed he took off his pirate hat (for the first time in about 14 months!)  This is how it turned out:
This is the other silhouette I did, of his brother, Emery.  His features are more defined, because he stood still at a better angle.
vintage silhouette art DIY children Just Peachy, Darling
One of the coolest objects I found for the wall was this vintage board game.  I couldn't find a date, but my guess is that it is from the late 1950s.  The game pieces were even unpunched, which is kind of like geek gold.
1950s space race board game vintage retro atomic  Just Peachy, Darling
Here is the inside of the cover:
The board and unpunched pieces (the four colored disks around the ringed planet).

We searched Google, Ebay, and Board Game Geek, but couldn't find any information on this game.  If you have any clues to when this was published, please let me know!  I also bought this Casper the Friendly Ghost game at the same flea market.  It was published in 1959 and I love the artwork!  Both games cost us about $4, score!
1960s casper the friendly ghost boardgame vintage retro  Just Peachy, Darling
I put Space Race into a shadow box and hung it on the middle of the wall.  If I can figure out a way to hang up the Casper board without damaging it, he'll find a home on my walls too.

All the other artwork was (almost) free!  The printables can be found here;
Rise and ShineYou bring color to my life, and the ABC printThe three 5x7 animal illustrations (including the frogs) are from a treasury of children's poems that I got for 25 cents from a school rummage sale.  There just happened to be some Charley Harper illustrations in the book.  Best quarter I ever spent!

The walls are now painted Teal Zeal (Behr) and there is a chalkboard paint racing stripe that goes around the entire room.  Only a couple more projects, and then I'll reveal the entire room...


Tuesday, February 21, 2012

Diamonds in the closet

We finally got around to painting the inside of Emery and Ohlin's closet.   After removing the doors, my husband painted the inside gray, and then I got to work stenciling.  I used an  old album cover to make my triangle template.  Since the record cover is 12x12, it was really simple to make a perfect triangle.  Don't worry, no great album covers were injured during the painting of this closet. ;)  I chose to paint my triangles in a pattern, so after I chose my five colors, I wrote a letter to mark each space (exactly like paint-by-number).  This is what the closet looked like after I was finished with the stenciling and taping off my first color:


In order to make this project low cost (FREE) I used leftover paint from other projects.  I ended up using chalkboard paint for the black triangles, and when I pulled off the painter's tape, the paint came off of the wall! Grrrrr.  Oh well, nothing a little touch up can't fix. 

how to tutorial paint triangle accent wall Just Peachy, Darling
I love it!! It reminds me of the facets on jewels, and it makes the yellow chevron curtains look really tied into the space.  Now Emery's dresser has a cool backdrop and we can open up the room for our little reading nook.

                  His dresser fits perfectly, and he seems pretty thrilled.  What a ham!

Monday, February 20, 2012

Joy to the world

  My brother and his lovely wife just had their first child, a baby girl, on February 10th.  I am so happy for the two of them, and was eager to meet the little sweetie.  I woke up the next morning, ready to drive up North for a visit, only to find mother nature had a sick sense of humor and had coated the roads with snow and ice.  Colorado in February, go figure.  Fortunately, this last Saturday, I was able to head up and meet my niece.  For the sake of my blog, I will call her "Joy", which is her middle name. 
Me holding "Joy" for the first time.

"Joy" (8 days) meets cousin Elowyn (8 months).  Hello, future friend.

Grandma and the proud papa gaze adoringly at "Joy."  What a wonderful addition to our family, welcome to the world baby girl!

Starburst cookies

On Thursday, I attended the Modernism Historic Study presentation.  We are extremely lucky to have had a historic context study of our city from 1940-82.  The presentation was a little light on photographs for my taste, but really interesting.  I could literally spend hours looking at photographs of important mid-century homes, businesses, churches, signs, etc.  We have some pretty amazing examples here, so maybe when things start to "green up" I'll drive around and catologue some of my favorites.  My husband was one of the presenters and asked me if I'd mind making some cookies to serve as refreshments.  Sure, darling, how many were you thinking? Not many...there should only be around 100 people.  Excuse me, what?
Luckily, I have some fabulous friends, my very own little Betty Crockettes who helped me cut out, bake, and decorate, all while wrangling some adorable pint-sized cookie monsters.
1950s retro starburst sugar cookies  baking housewife Just Peachy, Darling
I bought my starburst cookie cutter on ebay, just for the occasion.

We made frosting in pink and turquoise, it seemed really appropriate!

We made about 120 cookies when all was said and done.  It was the first time I got to legitimately wear my apron.  Good times! :)

Thursday, February 9, 2012

Light it up

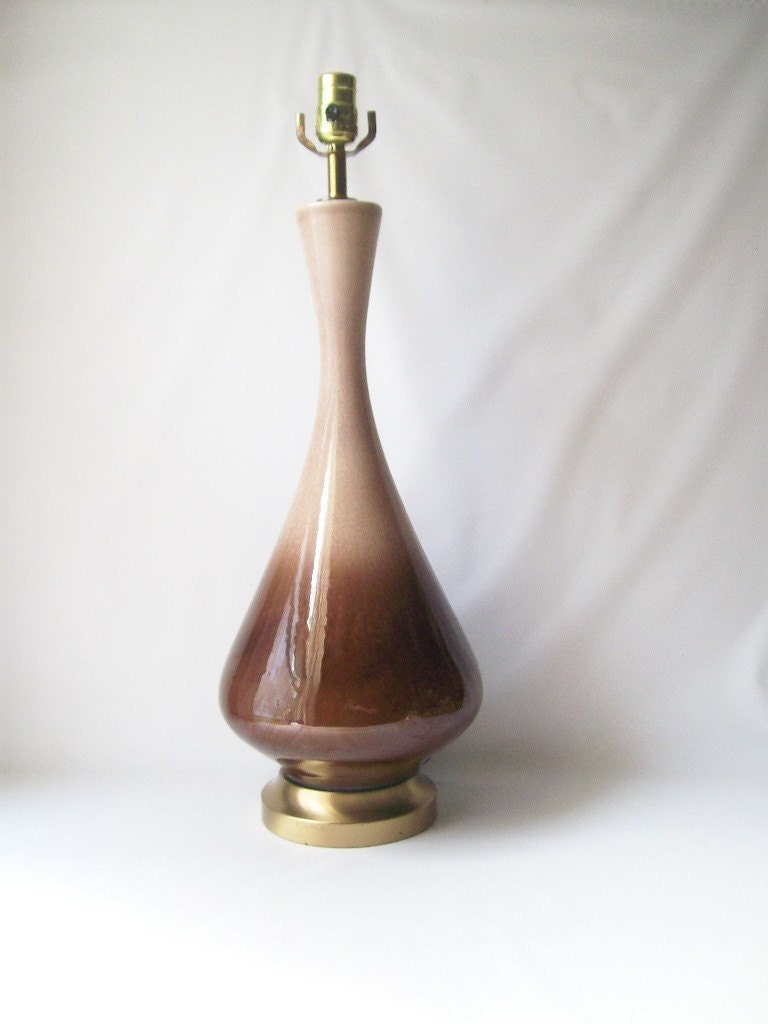
          My living room was built without an overhead light.  This requires that we fill the room up with lamps, but that can get pricey.  I found an odd little table lamp with an interesting shape at the thrift store for $2.50.  I'm always up for a challenge, so I scooped the little bugger up and headed off to find some hot pink spray paint.  Much to my dismay, there really wasn't a pink bold enough to satisfy my need, so I settled on a color called raspberry from Krylon. I taped off all the electrical components and used a coat of spray primer, followed by two coats of raspberry.  I completely forgot to get a before pic, but the lamp had a brown ceramic drip glaze like this one:
Here is a picture of my lamp after:

Next I took a plain white square (or parallelogram) lampshade from Target and covered it in fabric by Paula Prass called Zinnia Path.  If you are using a solid or repeating patterned fabric you can lay the shade down directly on the fabric and use it as a template, flipping it as you go, for one solid fabric piece.  
 Because the fabric I chose, has a clear "top" and "bottom" in the pattern, I chose instead to cut four individual pieces for each side of my shade.


I used spray adhesive to cover the lampshade and then add each fabric section, one at a time, allowing time for each side to dry.  Simply smooth out any air bubbles, until the fabric lies flat.  (warning, you're fingers are about to get really sticky!) Next, I took turquoise ribbon that was 7/8" wide and applied  one section at a time to each corner, to cover the seams.

When applying the ribbon to the top or bottom, you will be folding it over the edge. It is helpful to use clips to hold the ribbon down as the glue dries.


Here is a picture of my finished lamp:

retro mid-century mod lamp light covering a lampshade DIY tutorial Just Peachy, Darling


Sunday, February 5, 2012

Retro luggage advertisements

Am I the only one who loves old advertisements? 
retro luggage vintage ad Samsonite Just Peachy, Darling

love this ad from Samsonite.  She looks pretty ecstatic to be packing that bag!

retro luggage vintage ad Hartmann 707 Just Peachy, Darling
Wouldn't it be lovely if the plane dropped you off at your actual destination instead of the crowded, germ-filled airport?

retro luggage vintage ad Amelia Earhart Air lite Just Peachy, Darling

Hmmm, this seems like a really flawed advertising campaign idea.  Your luggage shall be lost and never heard from again.  People will ponder for decades what became of your Amelia Earhart Air-Lite Luggage.  Sorry, too soon? 
I decided I wanted to join in the fun.  Here is my best impersonation of a mod-stewardess (not flight attendant, mind you). 
Intergalactic space stewardess?

                                                                    Bon voyage!

Related Posts Plugin for WordPress, Blogger...